Rob Hawkins on Kitbashing Star Wars Buildings
12/12/2024
When Atomic Mass Games commissioned me to make a scrapyard-themed battlefield for the Star Wars™: Shatterpoint miniatures game, they sent a ton of plastic kits my way to bring the thematic setting to life. In this series of tutorials, I will give you a look at my building process and show you how I customized the various terrain sets and vehicles to create some evocative scenery elements. The different tutorials will focus on:
- Kitbashing Star Wars Buildings
- Making Wrecked Star Wars Vehicles
- Adding Scrapyard Rubble to Your Scenery

“Kitbashing” is an all-encompassing term for combining several different miniature kits together to create a new, unique miniature or scenery element. It can be as simple as adding a little extra detail to a standard building or as complex as cutting and rearranging the components to build an entirely new structure. Even if you don’t want to build a scrapyard, these kitbashing principles and techniques can be applied to any scenery project; the important thing is that you make every project your own, stylized to reflect what you want your battlefield to be.
In this installment, I will discuss adding extra detail like antennas, pipes, and tech elements, and I will show you how I used a combination of building parts, walkways, and other components to make larger structures, and how all the scenery was tied together thematically with its basing and color scheme.
This is a basic list of tools and supplies that I used for the project:
- Super glue (aka: cyanoacrylate glue)
- Hobby knife
- Clippers
- Pin vise
- Steel ruler
- Hot glue gun
- Heat gun (for bending styrene rod)
- Foam core board
- A variety of styrene rod, tubes, and L-strips
- Styrene sheets (aka: plastic card, 0.5mm, 0.75mm, and 1mm thickness are useful)
- Floral wire (16 gauge)
- Found objects like Yakult bottles and PVC pipe segments
- And, of course, a selection of Star Wars: Legion and Shatterpoint buildings, vehicles, and battlefield expansions
Adding Extra Detail to the Shatterpoint Terrain
The easiest way to spice up your Shatterpoint terrain is by adding extra technical details—antennas, control panels, cables, and pipes. The Star Wars: Legion Priority Supplies Battlefield Expansion is a set that every hobbyist should possess for terrain building. It contains a handful of moisture vaporators, communication panels, and supply crates, all of which can be cut up and used as scenery embellishments. In addition to making the terrain look more visually interesting, the added detail can also be used to convey the specific function of a particular building.
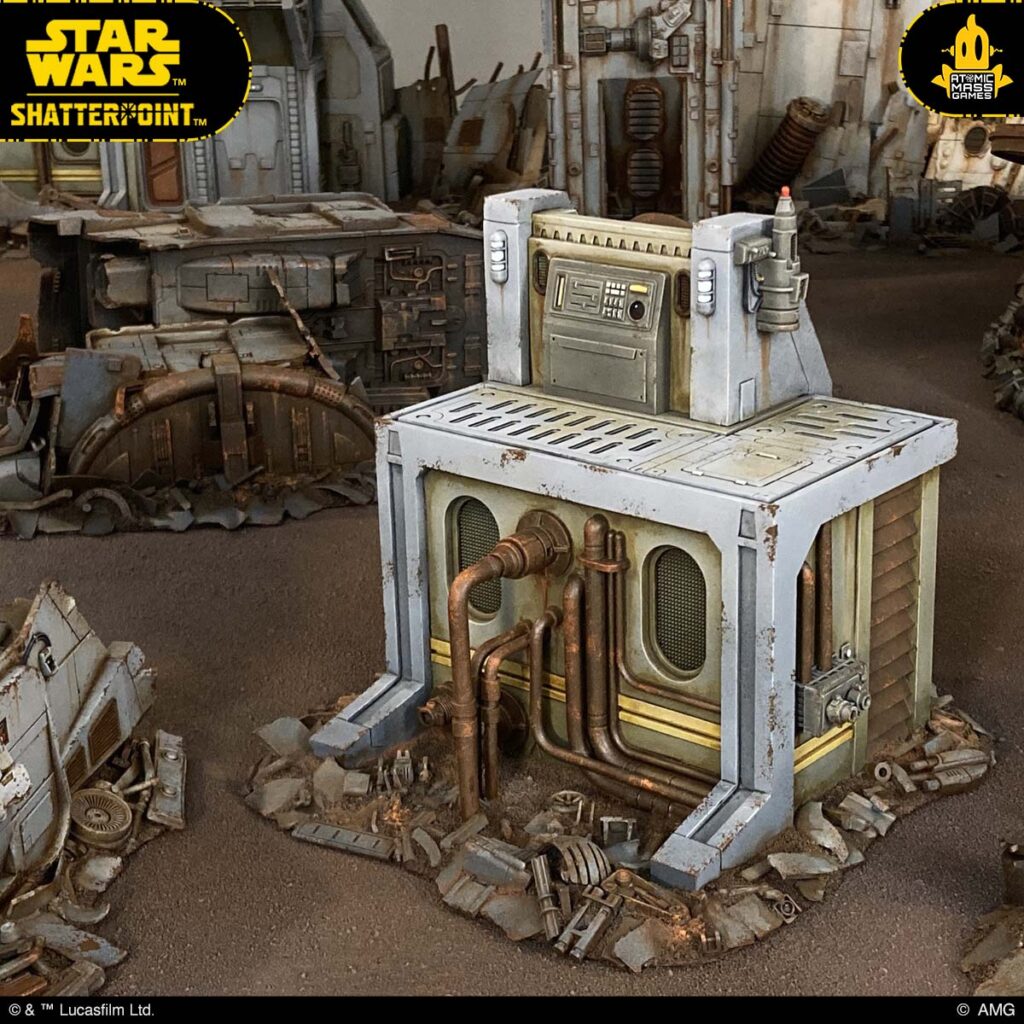
On the Tech Shed from the Take Cover Terrain Pack, I used the vertical poles from a moisture vaporator to add some light poles around the curved edge of the platform. On the top control console, I added the antenna portion from the comms station.
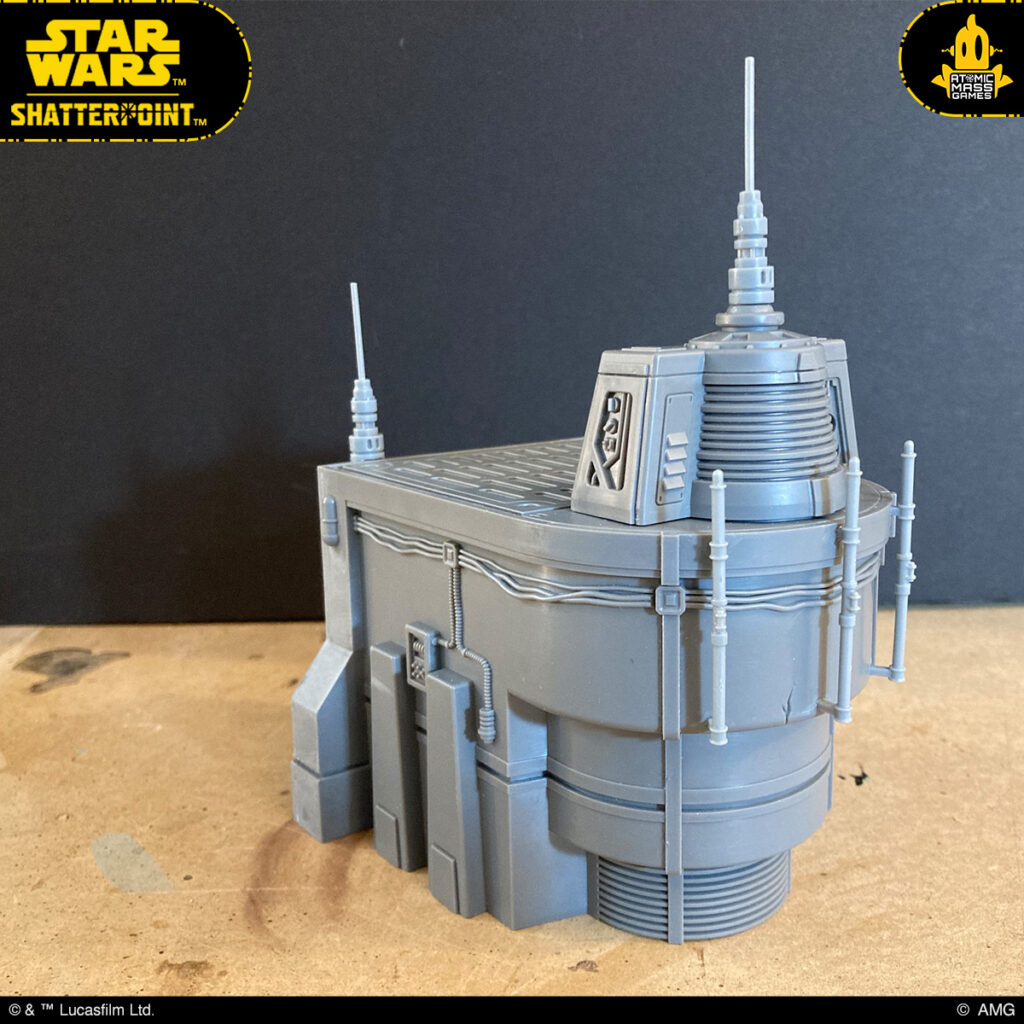
Another comms station antenna was placed over the door. This time I kept the entire part mostly intact, only trimming away the portion below the hanging wires. The piece fit snugly below the overhang of the roof. Since the moisture vaporators come in two halves, each half can be cut up and easily attached to a wall. I glued a bit of the vaporator in the blank area on the left side of the door. A piece of thin styrene sheet was used to cover the open ends of the vaporator and antenna components. Now, with all the extra antennas, the building looks like it serves as a communications outpost.

To embellish this building from the Shatterpoint Core Set, I added a bunch of extra pipes. The pipes were made from solid styrene rod. To bend the rod, I heated it with a heat gun until the plastic was soft enough to bend and then held it at a 90-degree angle until it cooled. This technique takes a little practice. If the plastic overheats, it begins to swell and deform; you want just enough heat for the rod to go limp and bend on its own, then lay it flat at the desired angle until it cools. It is important to note that only solid styrene rod will bend like this; if you attempt to heat and bend styrene tubes, they will only crimp and collapse in on themselves. Also, be sure to use the heat gun with a respirator and in a well-ventilated area, because the fumes from melting plastic are toxic!
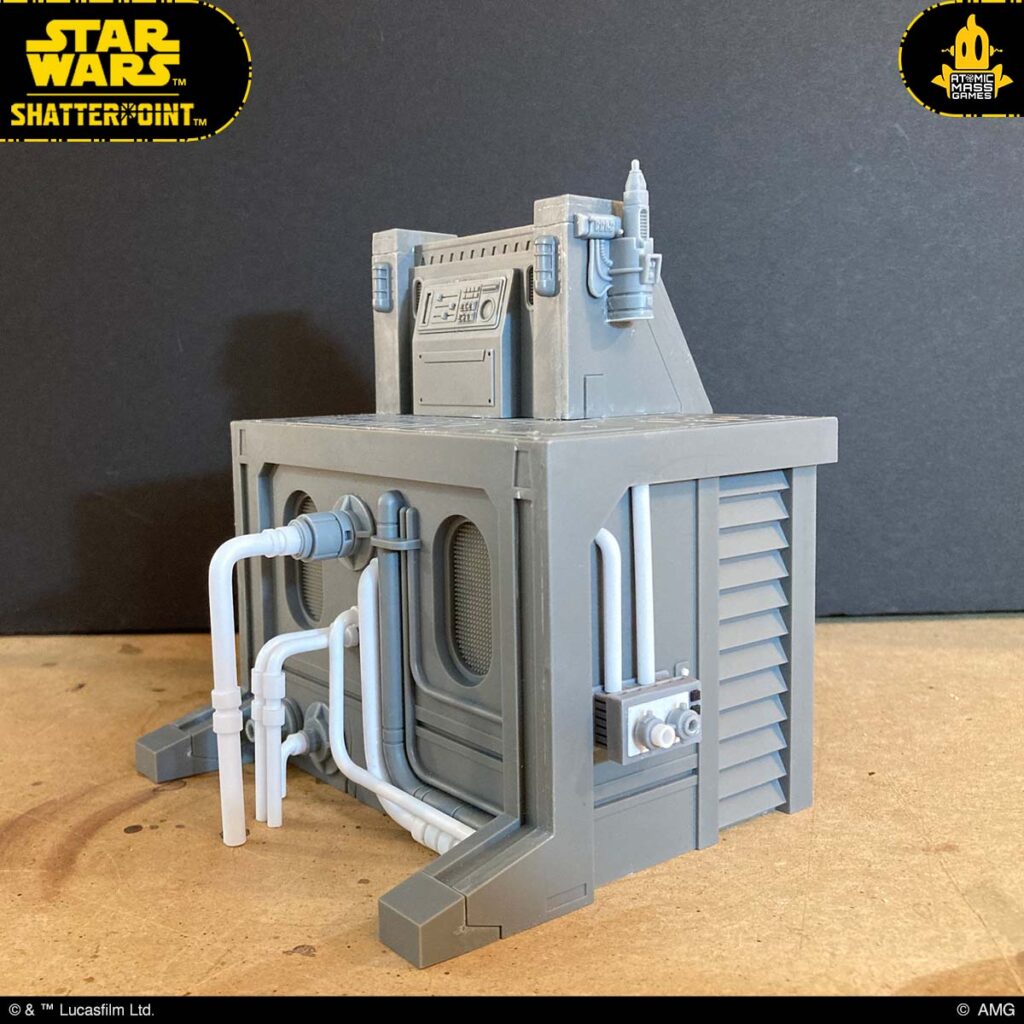
The “cuffs” around the pipes were made from styrene tubes. I selected a tube that was the correct diameter to fit over the rod and trimmed it into small segments. Then, I slid the segments over the rod and glued them in place. To create the attachment points on the wall, I used the bottom sections of some moisture vaporators and plugged the pipes into them. The box on the right side of the building is made from the bottom of a Legion E-Web Heavy Blaster’s power generator. It was glued to the wall and detailed with some sheet styrene, two segments of the top of a moisture vaporator and small ring cut from a styrene tube. One final detail that I added was another antenna from a comms station, this time with the antenna trimmed off so it looked like a small light. With all the extra pipes and the large vent, this building looks like some kind of pumping station.
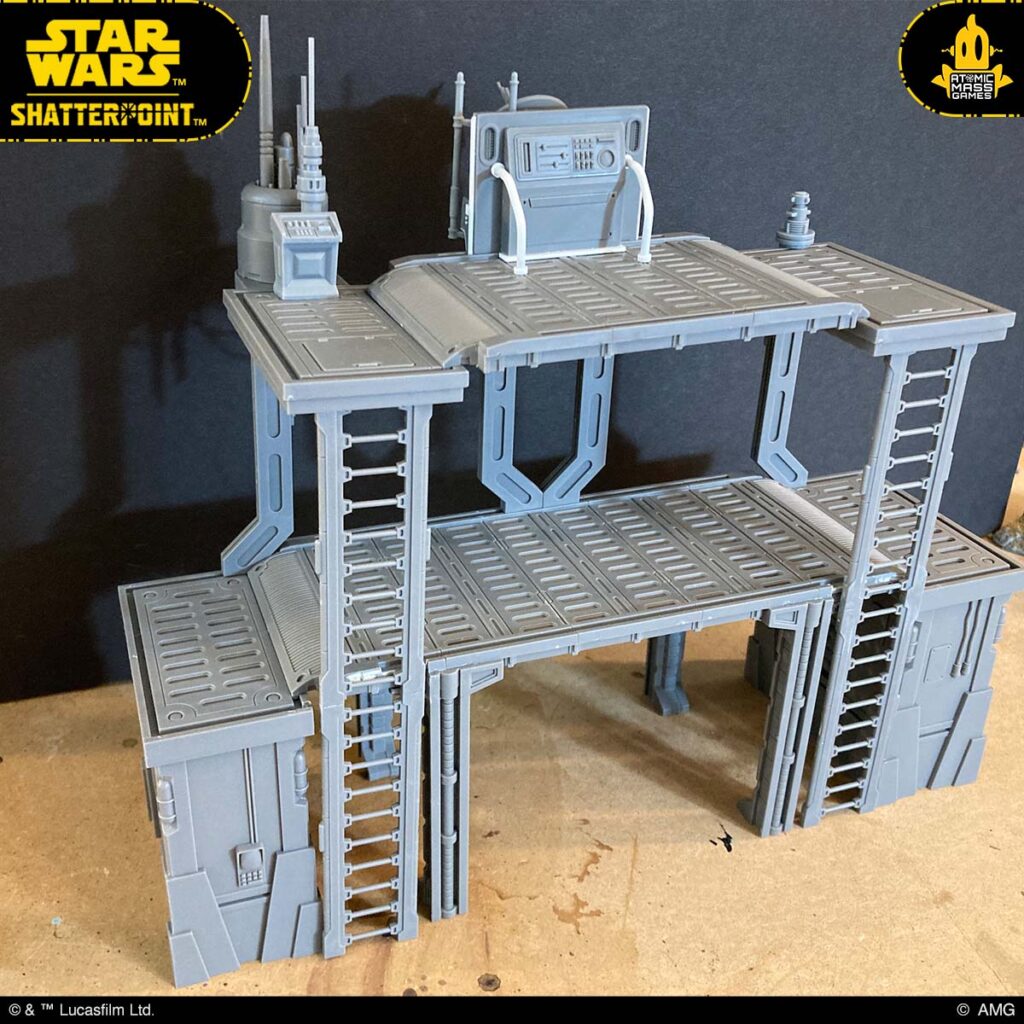
The third structure is this control tower. To make this piece, I combined parts from the High Ground Terrain Pack to create two levels with doubled-up ladders running to the hatches on the upper level. I added an intact comms station to the antenna array and mounted the wall section from the core set building in the center of the platform to serve as the main control console. For the small white railings, rather than bend them with a heat gun (which is difficult to control for precise bends), I placed thin styrene tube over 16-gauge floral wire and bent it into shape. The styrene tube bent around the wire, and the wire held its shape. As with the pipes on the pumping station, the cuffs at the ends of the railing were cut from larger styrene tube.
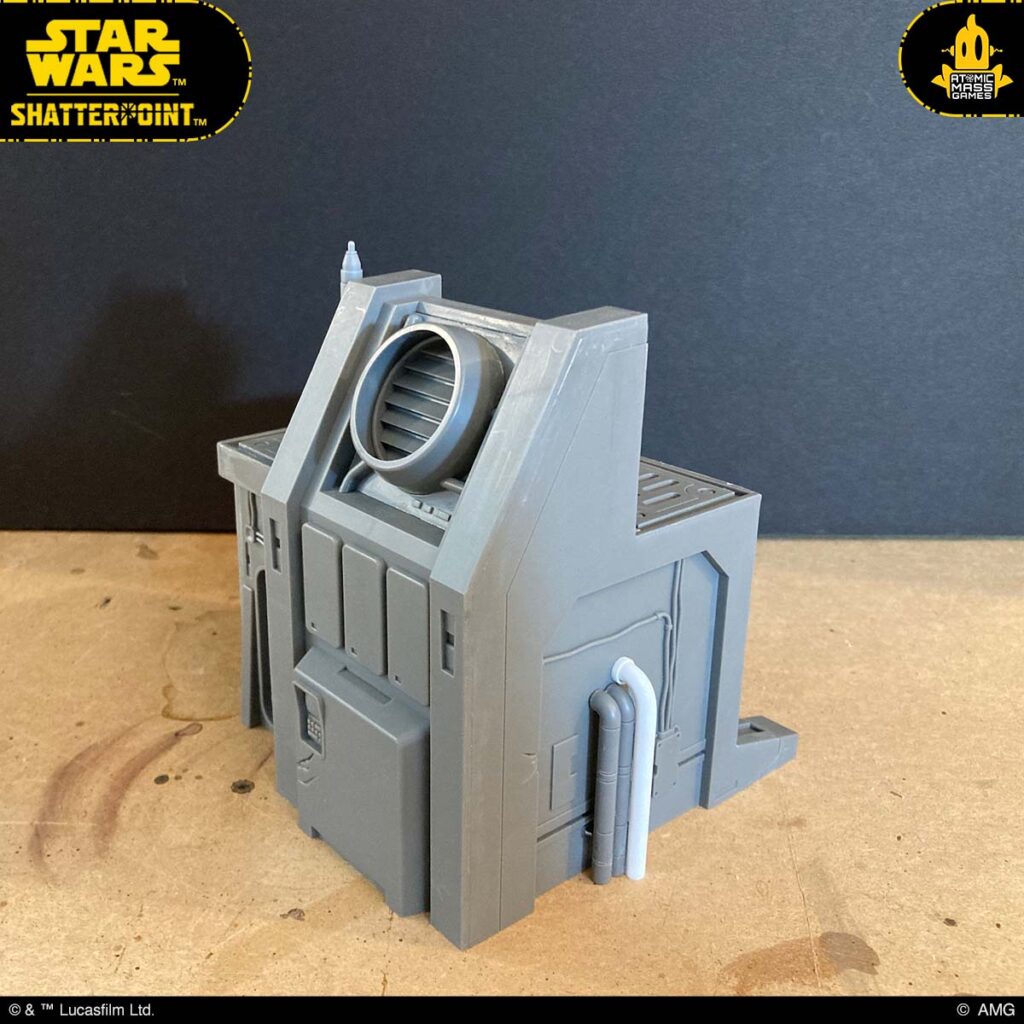
To decorate the opposite side of the wall with the control panel, I first covered it with a thick sheet of styrene card. Over the styrene, I attached the top of the Tech Shed’s control panel and the radar dish. The blocky protrusions on either side of the dish were made from the “feet” of the core set building, with styrene covering the gaps and small squares of styrene attached to create buttons and lights. Another moisture vaporator was used to add some extra tech detail, and the green cables were made from floral wire.

You can see how some relatively minor additions can add a lot of character to the basic buildings. When it comes to painting scenery, the Star Wars films all have a very particular color palette—lots of cool and warm greys and earth tones and very little “naked” metal in the environments. These colors also lend themselves very well to tabletop wargaming. A battlefield tends to look more cohesive when there is a limited color palette, and that also helps keep the environment from overshadowing the miniatures.
For this scrapyard, the main colors are grey, rust, and beige, with some ochre highlights. I used black spray primer to make sure all the recesses were nice and dark, and then I hit everything with a medium grey spray and then a light grey zenithal spray from above. After some washes, edge highlights, and rust patches, that took care of the main grey areas of the buildings. The beige inner walls were washed with a beige color over the grey and blotted with a paper towel to keep the wash mostly around the edges and in the recesses. For the rust, I used a mix of reddish-brown, dark metal, and orange. This was painted over the pipes, and then I used a sponge to apply the chips on the edges of the grey portions of the building and added some brighter patches of rust on the pipes and vents. Some of the rust color was washed in the recesses, and the streaks were added with a fine brush. The great thing about Star Wars is that it is a very worn and lived-in universe, so you can never make things too dirty, especially in this rusty scrapyard! Each of the buildings was mounted on a piece of foam core board, which was covered with all sorts of scrap made from the styrene off-cuts, bits of plastic sprue, and leftover parts from various model kits. I’ll discuss the scrapyard-themed basing in more detail in an upcoming article.




Kitbashing a Smokestack
After embellishing the basic buildings, I decided to use the remaining building sets to kitbash some other unique elements. I took two of the Tech Sheds from the Take Cover Terrain Pack and cut the wall pieces apart with a hobby knife. I set the walls aside for later and used the curved sections to make a smokestack.

By combining the curved portions of the two buildings and inverting them, I had the makings of a smokestack. Where the two halves came together, I was left with an uneven gap that needed to be covered.
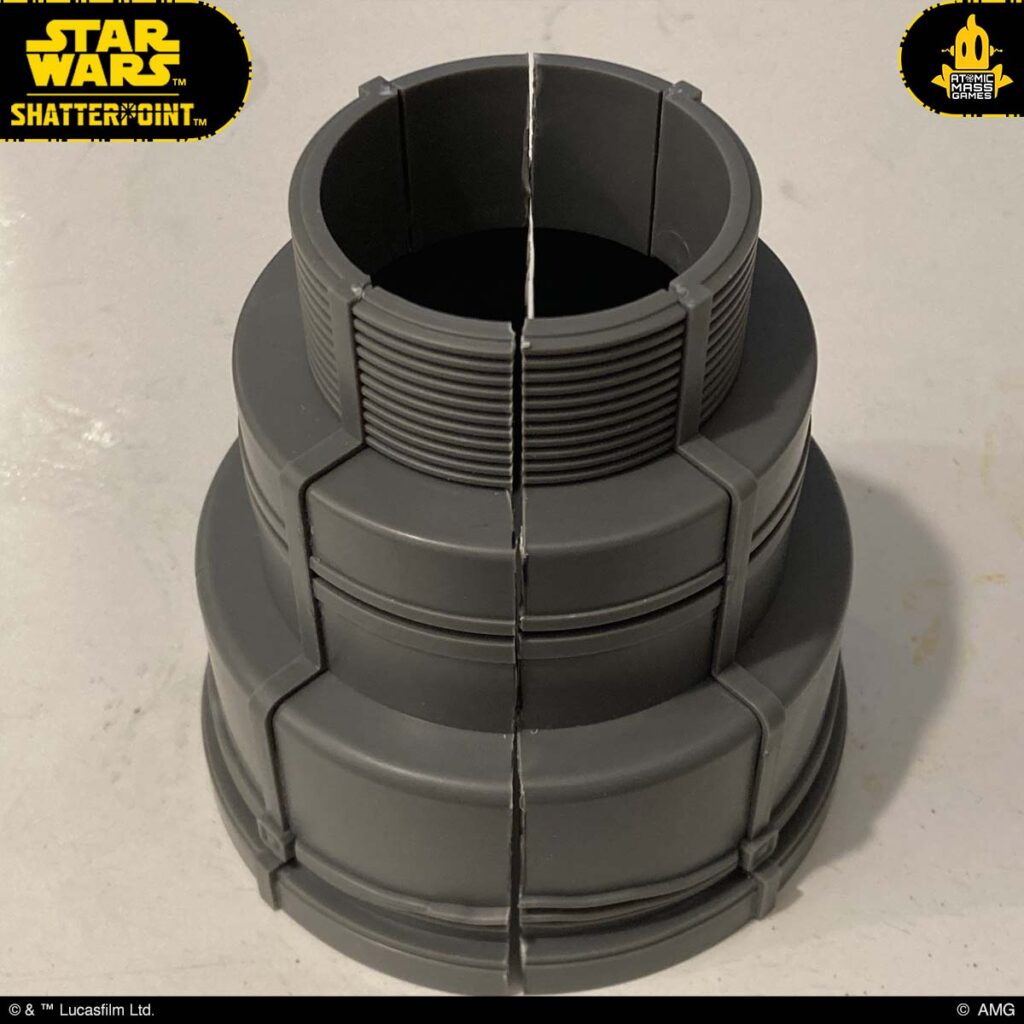
To cover the gap, I cut some styrene strips matching the width and thickness of the other vertical seams. Then, using a heat gun, I bent the strips so they could go over the corners. Starting at the bottom, I glued an L-shaped strip on each tier, covering the seam.

Where the cables came together, I cut away some of the sculpted detail to make room for more tech. I used sections of the trusty moisture vaporator to create a “junction box” for the cables to connect.

One of my favorite “found objects” to use in scenery building is a Yakult bottle. Yakult is a probiotic drink that can be found in most Asian supermarkets. The small bottles have a unique shape that’s ideal for representing smokestacks or engine thrusters—perfect for sci-fi kitbashing!

As it happens, the bottle was the perfect fit for the top of the smokestack. I put a little hot glue around the inside of the stack and pressed the bottle in place. Now, this would have been a perfectly acceptable stopping point, but I wanted to make the stack even taller.
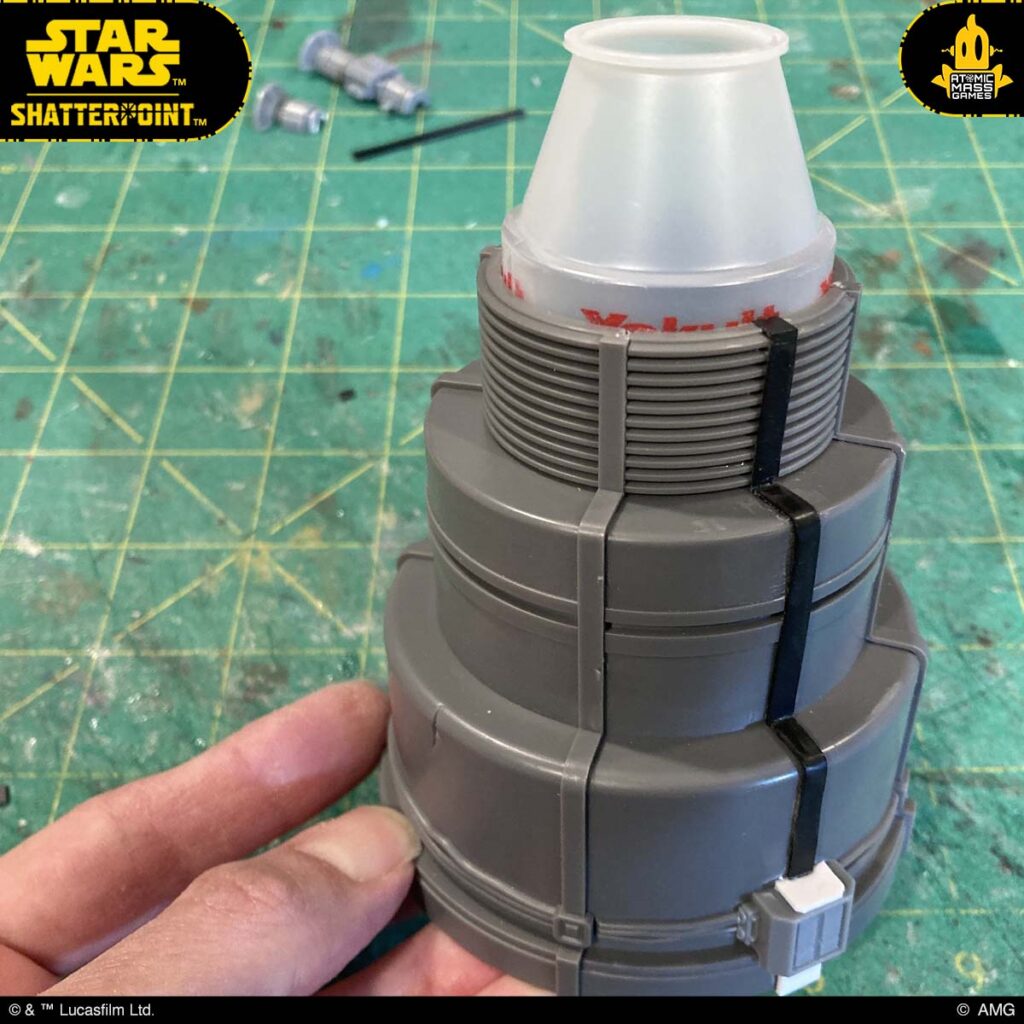
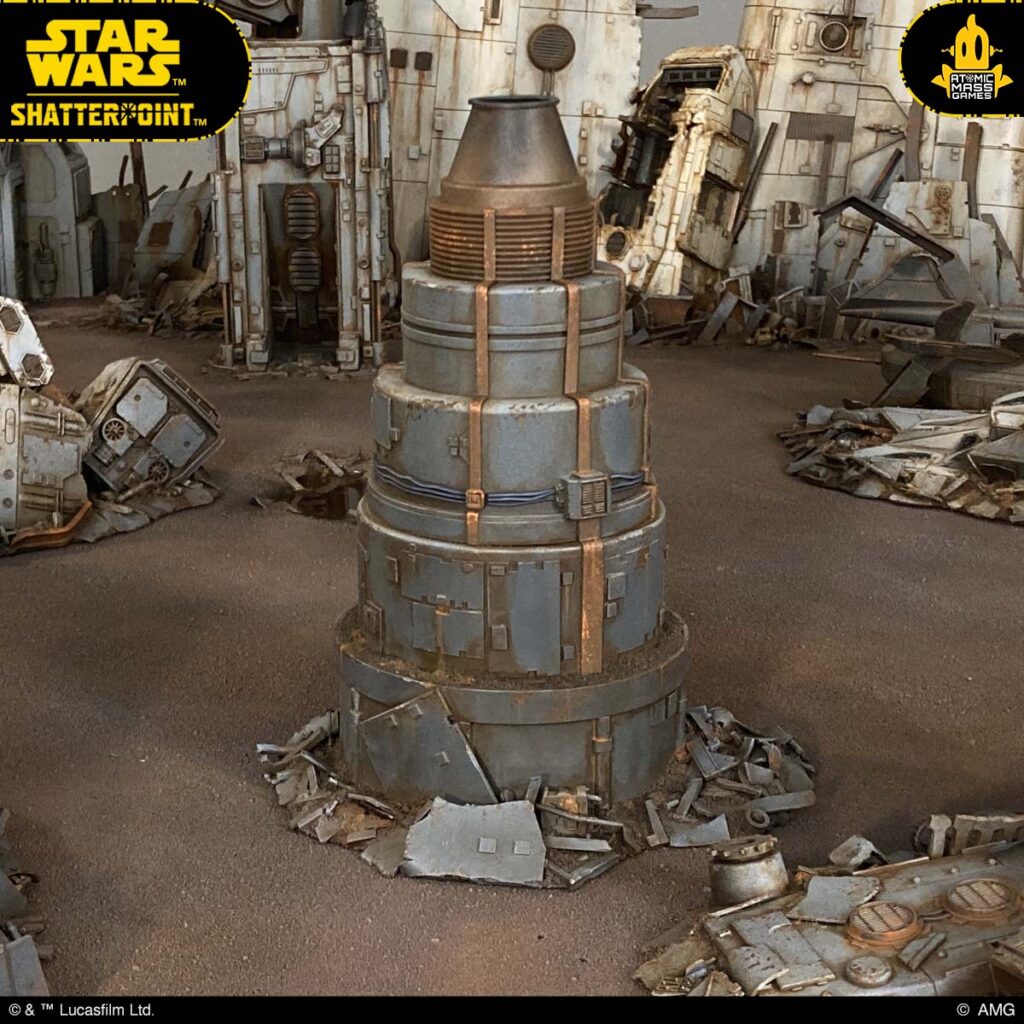
I picked up a 4-inch PVC pipe adapter to add some height. It was the perfect width to fit the smokestack on top of it. To add some paneling, I cut rectangles of 0.5mm styrene sheet. Each of the panels had some small squares cut out of the edge and were then super glued around the pipe. I also added a few panels on the upper portion as well. I saved all of the little square cut-outs and added them as detail on the panels. This was achieved by picking them up with the sharp tip of a hobby knife, dipping them in a bit of super glue, and then pressing them in place. If you look at images of the Millennium Falcon and other ships from Star Wars, you can see the style of paneling that I was trying to replicate. The paneling was also useful to conceal any printing on the pipe. In this image, you can see the lettering around the raised edge; I glued some sand and gravel over it when I mounted the smokestack on its base.

When it came to painting the smokestack, I used a darker gray base spray and drybrushed the edge highlights. I also washed a considerable amount of rust and brown into the recesses.

Kitbashing a Large Building
I needed to make some large structures to serve as a photography backdrop for the setting. This large building incorporates the techniques discussed earlier and includes parts from the Shatterpoint buildings and walkways, with some styrene to fill in the gaps.

I had a general idea of what I wanted the building to look like and planned to use foam core board for the under structure, with plastic components over top of it. The front surface of the upper level was made from walkway sections. I glued six sections together, with their undersides facing out (since the undersides are usually hidden, this was a chance to utilize those details in a new and interesting way). I laid some thick styrene card in the gaps to cover some of the slots and added another layer of styrene over top of that to conceal the joins between each section.
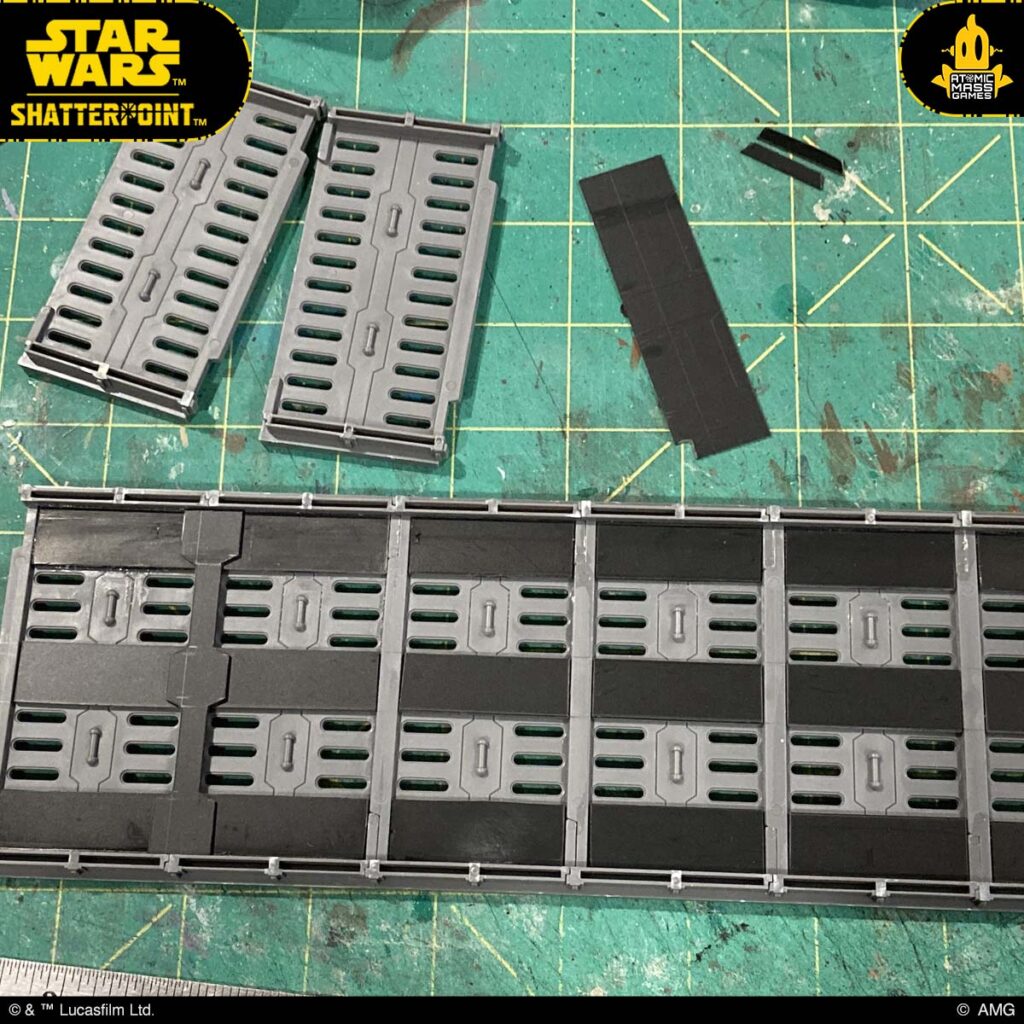
That first wall section established the width of the entire building, so I then cut the foam core board and used a hot glue gun to assemble the framework. I cut the depth of the building to match the plastic wall section at the bottom. In this image, you can see where I made some cut-outs to accommodate the recessed doors and panels on the Shatterpoint terrain, allowing the plastic components to sit flush on the foam core.

On the front, I pieced the wall sections together and affixed them to the foam core board with super glue.


The large doorway was made by cutting out the door frame and gluing a thick strip of styrene around the edge. The door itself was made from a sheet of thick styrene with the door seam etched into the plastic with a sharp sculpting tool. I used a pair of walkway legs for the detail around the door.

To add an extension on the side of the structure, I cut apart one of the Shatterpoint building components.
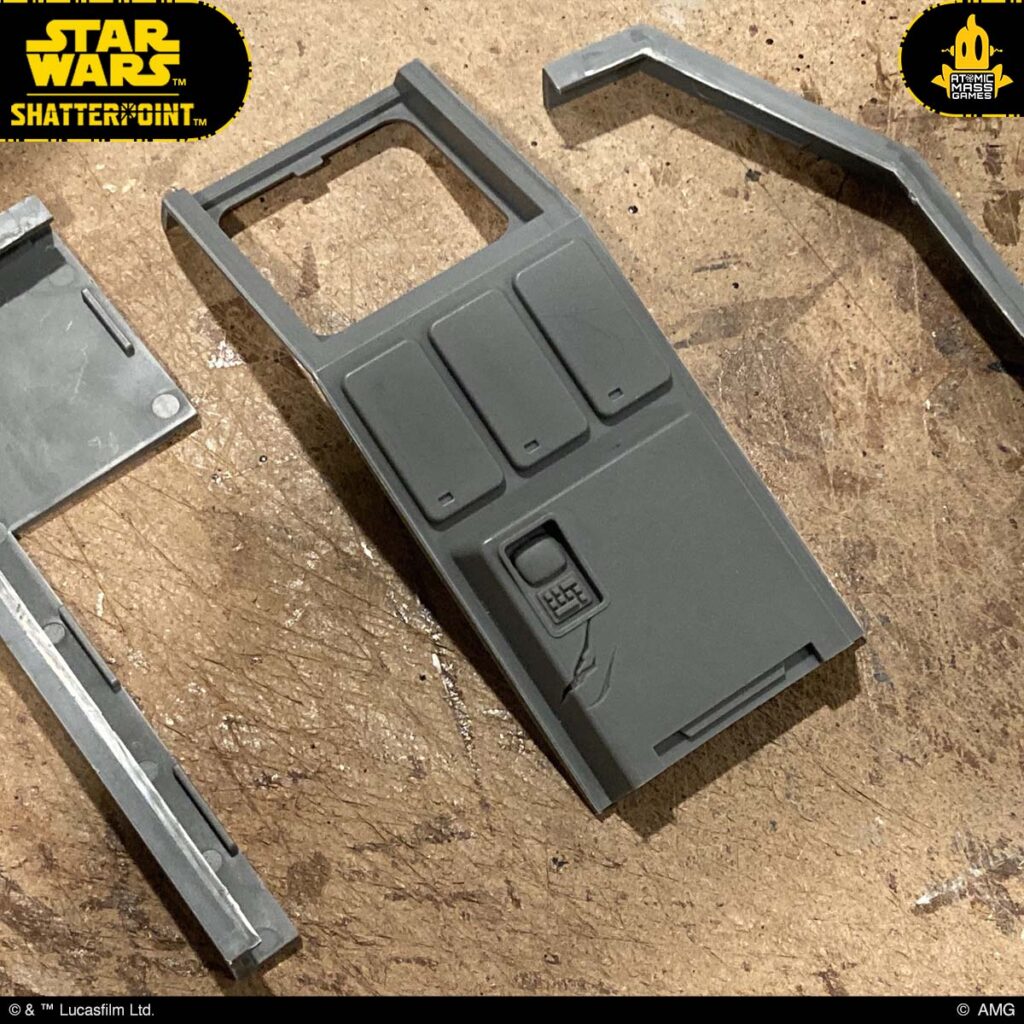
I used multiple layers of sheet styrene to build up the sides of this component, so it could fit snugly against the wall.

With all the major components in place, I used styrene L-strips to cover the exposed corners of the foam core board and added some additional strips to create panel sections. The upper areas of the side walls were detailed with walkway sections, building rooftops, and more styrene card. On the rooftop, I added the generator from the Take Cover Terrain Pack. The smokestack was made by combining the circular portions of two Tech Shed computer consoles, some small PVC pipe attachments, and a bit of floral wire.
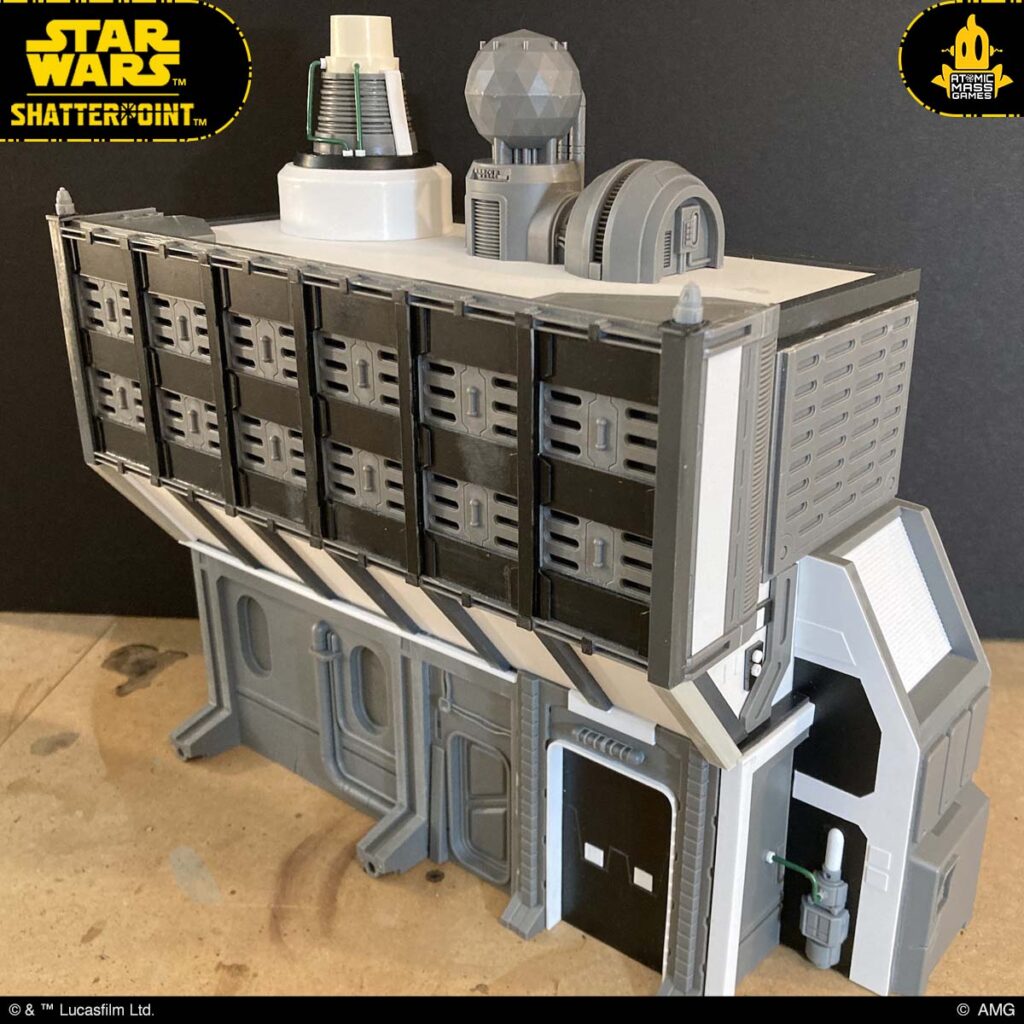

The building was painted to match the smaller structures, and because it was part of the backdrop, it was permanently attached to the board.

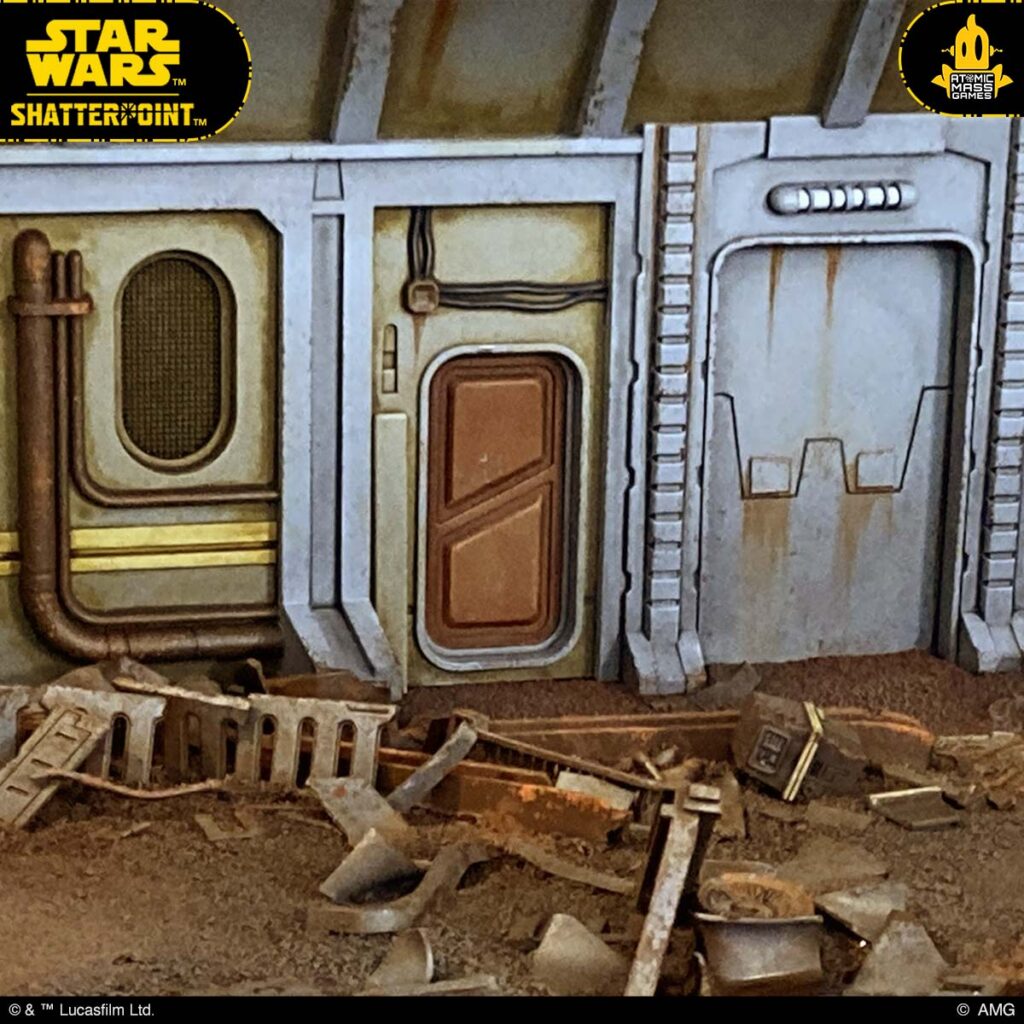
I hope this has given you a few ideas on how to customize your own terrain and give your battlefields some extra character. In future articles, I’ll cover the scrapyard basing and making vehicle wrecks.
Thanks for joining us on this exploration of kitbashing! We can’t wait to see how you use these ideas, and come up with your own. Be sure to share them on socials, and check back here for future transmissions that deep dive into building unique terrain. Get started building your own terrain with Star Wars: Shatterpoint terrain, available at your local game store or through the webstore.
Until next time, Atomic Mass Games, signing off!